PAINTINGS
Creation of Thanjavur paintings
Step by step instructions
- Sumathi
email: iheritage@gmail.com / sumathi.saigan@gmail.com
www.sumarts.biz where I feature/sell my art work - Tanjore paintings, Folk paintings, and many other craft pieces
March 2011
last updated Aug 2016
My first stint at making Tanjore paintings
was in 1990, when I attempted it without attending classes. The internet
did not offer as much information then as it does today and all my
knowledge came from tips that I got from friends and relatives who were
practicing the art.
I made a brave attempt, and these are some of the paintings that I made
around that period from 1990 - 2000.
My re- exploration of the art began
in 2011.

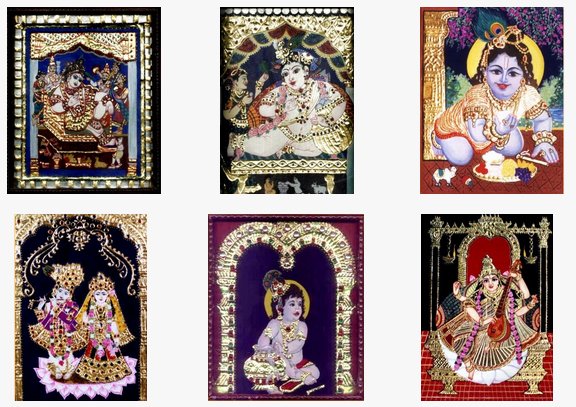
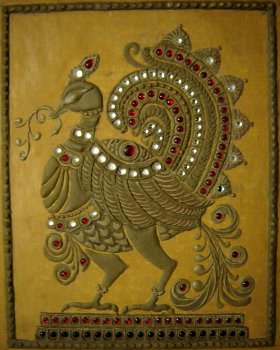
Tanjore painting by Sumathi

Tanjore painting by Sumathi

Tanjore painting by Sumathi
Iam still experimenting, learning and am sharing the process. Here, Iam providing the step
by step procedure of creating a Thanjavur painting.
Board preparation
The board thickness depends on the
size of the painting. It is best to use at least 8mm thick water proof board so
that it will not bend under the weight.
Cut a piece of gaada (unbleached)
cloth free from starch which is atleast 1 inch bigger than the board on all sides.
Make a thin paste by mixing water
to white glue (4:1 ratio). Soak the cloth in the white
glue water mixture. Squeeze to remove excess glue. Stretch this cloth on the board and gently smoothen the cloth
from centre to the edges making sure there are no wrinkles. Paste the excess cloth firmly on the reverse side using white glue.
Mix chalk powder, white glue
and water in the ratio 2:1:1.5. Apply
three coats of this mixture on the board using a flat 2" brush. If
the first coat is applied in the horizontal direction, the second can be
in the vertical direction. In between each coat, allow time to dry
and smoothen the board with fine emery paper. After the final coat, allow
the board to dry for a day.
(Several sites suggest mixing arabic gum equal in proportion to the
chalk
powder and a little
white glue while making the paste to be applied on the board. I am not
happy with this mixture. May be I have not got the proportion
right.)
Doubts from visitors to this site
*
When I prepared board for Tanjore painting with proportion suggested by u, I see lot of small pores on it.
Try smoothening with emery paper (smooth paper) and then apply
another coat. Also try thinning the paste if it is too
thick. It should spread easily on the board and should not be
thick and patchy.
There is no real hard and fast rule about the ratio.
Actually I find that depending on the type and brand of chalk powder
and white glue, the ratio varies. When you rub with emery paper
if almost all of the layer is powdered off, then you need to add more
fevicol. When you rub, if nothing comes off and you are not able
to smoothen the board at all, then reduce the amount of fevicol.
When in doubt, smoothen the board with emery paper and then apply the
next coat.
Finally you can use a heavy glass paperweight or bottle to smoothen the surface.
Paste a newspaper sheet on the reverse to cover the rough folded cloth.
Smoothen the board with emery paper and
then with a rounded glass bottle or paper weight to get the smooth
finished board. (if it is a plank, it is better not to cover the back,
allowing space for the plank to breathe)
Std board sizes: 10x8 ;
15x12 ; 16x15 ; 20x16 ; 18x24 ; 24x30
; 24x36 ; 36x48 (inches)
Wood used: Wooden planks
such as Teak, jackwood (palaa maram) or water proof, termite proof plywood.
Tracing the pattern
On the preapred board, draw a 1 cm border. This allowance is to make space for the framing.
Allow space for a border -
gold lines - of dots, stones or mirrors.
Then trace the selected picture
on the board using yellow or red carbon.
Pasting stones
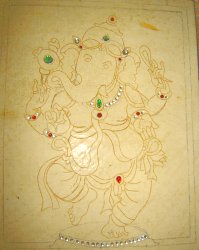
Paste the stones using white glue
at the required spots.
Muck preparation
Muck is the paste that is used to
create the embossed effect in Tanjur painting - the gold foil is later
pasted over these raised areas.
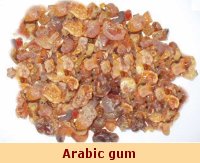
The muck is prepared using arabic
gum and chalk powder (putty chalk powder or french
chalk powder). It is best to prepare the muck a few days ahead
of use to make it pliable for use.
Soak the crystal gum in water, so that the crystals are completely
immersed. Leave it for 2-3 days. Stir and filter the gum
using a fine cloth to get a clear gum solution, neither too watery nor
too thick.
French
chalk powder is finer and whiter than putty chalk powder. There
are different grades of putty chalk powder available and the ratio of
the mixture will depend upon your brand. Please prepare
accordingly. The paste should be neither too thick to be patchy
nor too runny.
The proportion for muck
Mix 3 portions putty chalk powder / french chalk powder with 1 portion arabic gum.
This thick muck can be used for the final intricate designs which can be created either with a brush or a cone.
Soak the chalk powder in water for a long period (months) for best results.
(Putty chalk needs straining. Make a very thick paste of the
putty chalk and use a tea strainer to make a thick smooth paste and
use this paste for making the muck.You can also strain it after mixing the chalk powder and gum.)
The muck is usually applied
to the board in 3 consistencies.
1. The first level when applying over
stones is thin - you should be able to drop it on to the board.
2. At the second level, when applying on plain
areas without stones, it should be thicker.
3. Finally when doing the
intricate design work it should be even thicker.
To test the consistency of the muck, drop a little on to a board to form
a smooth round sphere. When it is dry it should be smooth.
Then the consistency is right. If it dips in at the centre, there
is too much gum and if it cracks, then there is too much chalk powder.
The intricate embossed designs can also be applied using a cone prepared
out of plastic paper.
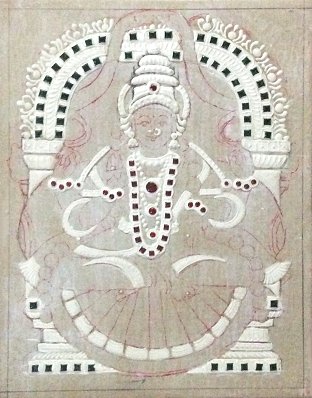 
Applying Muck
Apply the first level of muck over the stones.
To the thick muck add a little thin gum solution. (it is suggested that it is always
better to add very thin gum to dilute the muck rather than water).
Mark an outline around the stones to prevent the muck from running. Now
drop the muck over the stones. Do not brush too hard. Just use the
brush to guide the muck into the gaps. Make sure the entire area is
covered smoothly. The muck will automatically settle down smoothly over
the area. Allow to dry.
Allow the muck applied on the stones to dry completely. Brush some water
on the dry muck and rub gently in circular motion with a moist cloth to wipe off the the
muck on the stones, ensuring that the surrounding area is not damaged.
Before wiping off the muck, draw the outlines of the figure using a water proof pen,
so that the traced image is not wiped off when cleaning the stones.
Then create the second level of
embossed designs with the medium muck - lines, dots big and small.
When this is dry, make the third
level of designs with the thickest muck - the thin lines around the stones
and other designs.
Allow the muck work to dry completely.
Prepare a very thin watery solution of the muck. This muck
solution can be applied over the entire board. This will give a
very smooth surface and the pasted gold foil will look smooth and
finished.
Now stick gold foil on all the embossed
areas. Place the gold foil on the area, press, take the impression and
cut out the foil with a few mm allowance. Apply gum on the reverse, paste the gold foil
and press lightly
with a thin fine cloth, making sure the gold foil does not move out
of position or tear. Then press well so that the impressions are
clear and there are no gaps or air pockets. When all the muck has
been covered with foil, cut off all
the excess foils around the design. Scrape out the foil on the stones
with a sharp needle or pin.
Paint the design.
Indian Heritage Pinterest collection of How to do Tanjore Paintings
Indian Heritage Pinterest collection of Tanjore Paintings
Visit
www.sumarts.bizwhere I feature/sell my art work - Tanjore
paintings, Folk paintings, and many other craft pieces
Related links
goldenstreak.weebly.com
paintinghistory.in/
Sites that give detailed instructions for making a Thanjavur painting
indusladies.com/forums/...
Materials are available at:
P.Rama, Mandaveli , 6381918934
gurubarantanjorearts.com
Chola Impressions Art Gallery
9 & 10, Rangesh Complex, 102E-2, Rajaji Nagar, Medical College Road,
Opp South Zone Cultural Centre, Mooligai Pannai Arch, Thanjavur, Tamil Nadu, India - 613004
Ph : +91-787-505-4510 / +91-882-542-7058 / connect@cholaimpressions.com
|